In this project, we built three musical instruments to learn about waves. We built a trombone for our wind instrument, a one string guitar for our strings instrument and a set of chimes for our percussion instrument.

Instrument Descriptions
Below you can read the descriptions of each of our instruments and how they work:
Trombone
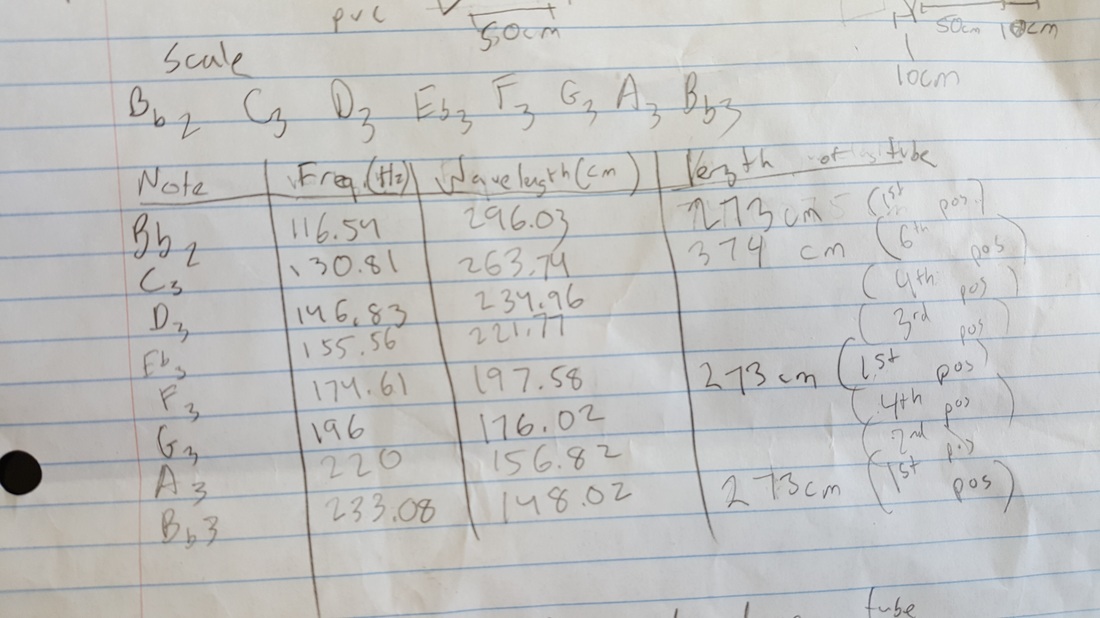
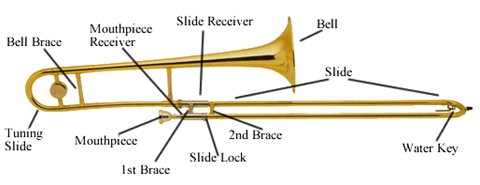
Changing the length of the slide on the trombone changes the wavelength of a note. When playing a trombone, your lips make a vibration and the wave travels through the pipes of the trombone and come out at the bell. Trombone players change notes by moving the slide, which changes the length of the piping changing the wavelength. Another way of changing the note is by changing the way your lips vibrate. When you want to play a higher note, you tighten your lips, which creates a faster vibration in your lips. We know the faster vibrations create a higher frequency which increase the pitch of the note.
The slide changes the pitch because it will create a different wavelength. However, the wavelength of a note is not directly correlated to a specific slide length because of the way you can change your lips vibrating. The slide in the first position makes the entire length of piping 273 centimeters long. As you move it out, it increases the length of the piping. If the piping is longer, it will create a note with a longer wavelength. The last position is about 120 centimeters longer than the first position. Analyzing this data, we can see that we can use the different lengths of slide and the different ways you can vibrate your lips to create a scale. On our trombone, the first note of the scale is a Bb. To play Bb, you have the slide in first position and buzz your lips with a relatively slow vibration. Then the scale continues as a Bb major scale with: C, D, Eb, F, G, A, Bb. You have to change the slide length and make your lips vibrate faster by tightening them to go up the scale. Loosening your lips will make your lips vibrate slower and you will play a lower note. That is how you can play different notes with the slide in the same place. In 1st position, you can easily play 4 different notes. So, once you can learn the slide positions and how to vibrate your lips, you can play the trombone!
The slide changes the pitch because it will create a different wavelength. However, the wavelength of a note is not directly correlated to a specific slide length because of the way you can change your lips vibrating. The slide in the first position makes the entire length of piping 273 centimeters long. As you move it out, it increases the length of the piping. If the piping is longer, it will create a note with a longer wavelength. The last position is about 120 centimeters longer than the first position. Analyzing this data, we can see that we can use the different lengths of slide and the different ways you can vibrate your lips to create a scale. On our trombone, the first note of the scale is a Bb. To play Bb, you have the slide in first position and buzz your lips with a relatively slow vibration. Then the scale continues as a Bb major scale with: C, D, Eb, F, G, A, Bb. You have to change the slide length and make your lips vibrate faster by tightening them to go up the scale. Loosening your lips will make your lips vibrate slower and you will play a lower note. That is how you can play different notes with the slide in the same place. In 1st position, you can easily play 4 different notes. So, once you can learn the slide positions and how to vibrate your lips, you can play the trombone!

|
|
Guitar
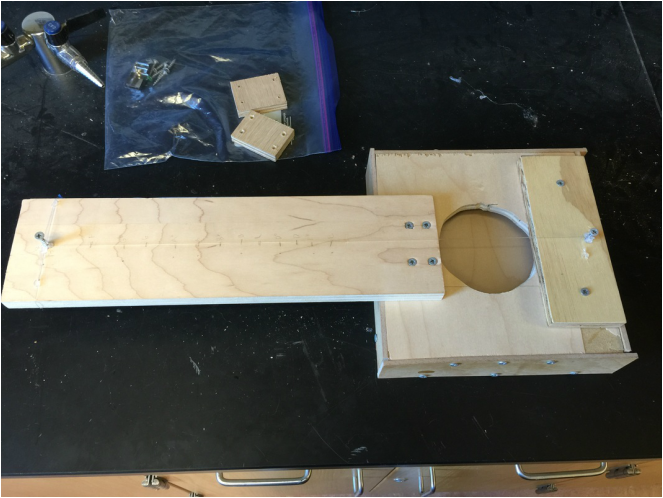
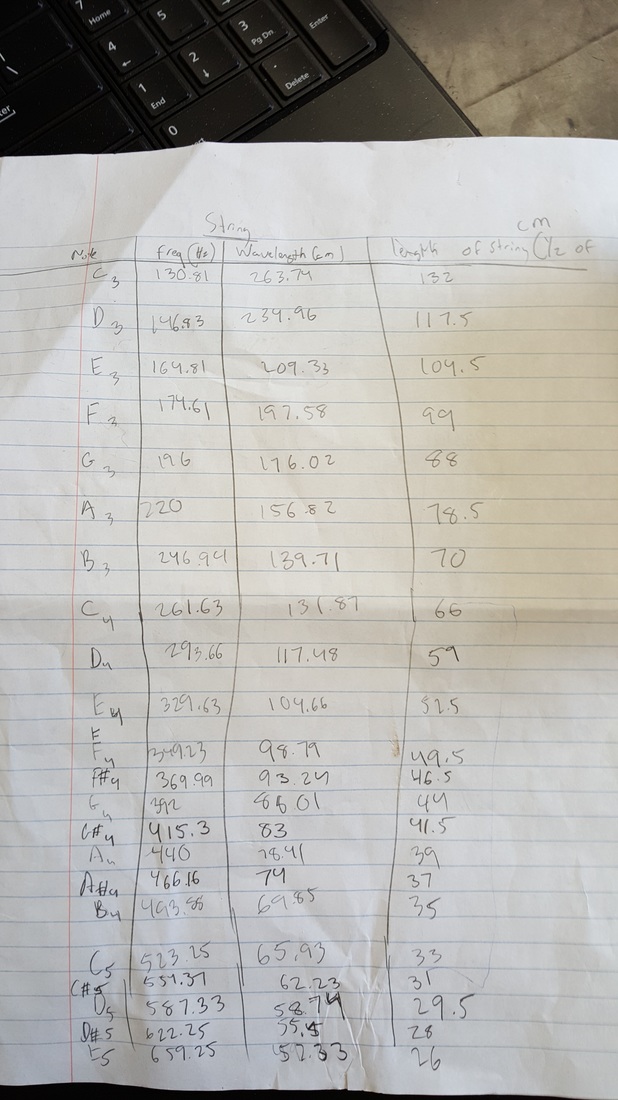
String instruments change pitch when the length of the string increases or decreases. String players move their fingers along the string to change the pitch of a note. They also can play on different strings that have different tensions or widths. However, our instrument only has one string, with one tension, so the way we change notes is by moving the position of our fingers. We found that pushing down on a part of the string creates an artificial end of the string, and makes a new length that ends there. So, to create a certain note, find out how long the string has to be and press down there. Our instrument has a string that is 52.5 centimeters long, which normally produces an E. If you press down the string at 49.5 cm and play, it produces an F. So you can play any note possible provided your string is long enough. So knowing all of this data, you can play an entire chromatic scale from E4 to E5. So, in summary, the string instrument works by artificially shortening the length of the string being played, reducing the amount of material vibrating, which then makes the note higher.
Strings also may need something to amplify them. Some instruments have a hollow box and electric string instruments can use a pickup and an amp to make the sound louder. Our design uses a box with a hole in it, but it doesn’t amplify the sound because we used wood that is too thick, so the string can not vibrate it. Ideally, the string would vibrate the wood and the sound would be amplified by the box.
Strings also may need something to amplify them. Some instruments have a hollow box and electric string instruments can use a pickup and an amp to make the sound louder. Our design uses a box with a hole in it, but it doesn’t amplify the sound because we used wood that is too thick, so the string can not vibrate it. Ideally, the string would vibrate the wood and the sound would be amplified by the box.
|
|
Chimes
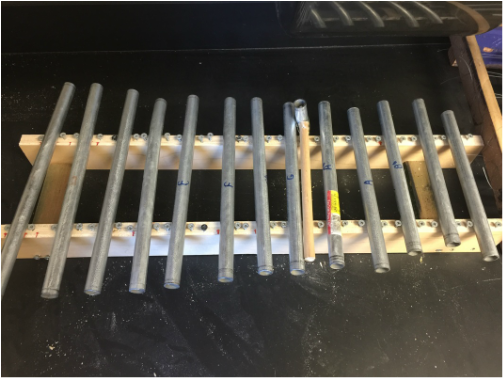
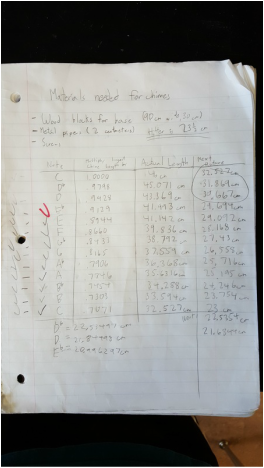
The length of the chime does not always affect pitch. We based our chimes off of a design similar to a xylophone. We would have thirteen notes, all notes from C to C including sharps and flats. To do this, we would first get a metal pipe and then use a tuner app to find out what note the pipe made. We then used a ratio chart to find out what length the pipes had to be to make specific notes. We had to measure what the natural frequency was for the pipes we had because every material has a different composition and thickness which changes the frequency. The larger the chime, the longer the wavelength is, but only if all the metal pipes are the same material. The longer the wavelength, the lower the frequency, the lower the pitch. The lower the pitch, the lower the note is. We ran out of the EMT pipe though, so we had to use a wider pipe. We found out that this pipe had a higher natural frequency and we couldn’t use the same ratios that we used for the EMT pipe.
The first pipe we tested was 46 centimeters. This chime was a C. To find out what length the other pipes had to be, we multiplied the initial measurement by the ratios for the other notes. To get a Db, we would multiply 46 centimeters by .9798. To get a D, we would multiply 46 centimeters by .9428 and so on. After we measured and cut the EMT pipes, we used a tuner to confirm we had done our calculations correct.
Our chime design was pretty simple. We got a 66.5 cm piece of wood from the shed and split it in half so that we would have two equal halves. Then, we connected them 12.5 cm apart from each other by getting a 25 cm piece of wood, splitting it in half, then screwing it in on either sides of the longer piece of wood. As soon as we had the structure, we started putting our 13 note scale on top. Basically, we screwed in small screws on the tops of both sides of the wood to keep the chimes from falling off or moving around too much. We did have the screws pretty apart to keep the sound as loud as could be because if the screws were touching the chime it would suppress and dull the sound. We did that for all 13 notes and measured the chimes at 5 cm apart to use up the whole piece of wood.
Something that we discovered was that the more center the EMT pipes were between the two pieces of wood, the louder they got. Most of the other groups had used rubber bands to slightly elevate the chimes so they could ring freely. We think this is so because when the pipes are centered, the two ends are more equal so they can produce their sound more evenly.
|
|
Concepts
We learned about waves and parts of waves.
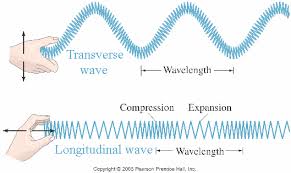
Types of waves:
-transverse: movement perpendicular to wave direction, don't require a medium
-longitudinal: movement parallel to wave direction, require a medium
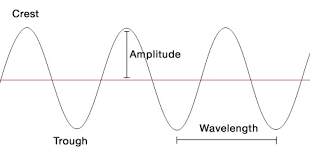
Parts of a wave:
-crest: high point in a wave
-trough: low point in a wave
-amplitude: distance from crest to equilibrium
-equilibrium: mid line of a wave
-wavelength: distance from crest to crest, trough to trough, etc.
-frequency: how many waves occur in a second
-velocity: speed of a wave
Types of waves:
-transverse: movement perpendicular to wave direction, don't require a medium
-longitudinal: movement parallel to wave direction, require a medium
Parts of a wave:
-crest: high point in a wave
-trough: low point in a wave
-amplitude: distance from crest to equilibrium
-equilibrium: mid line of a wave
-wavelength: distance from crest to crest, trough to trough, etc.
-frequency: how many waves occur in a second
-velocity: speed of a wave
We also learned how long to make chimes, strings, and tubes for instruments. You can read how in the instrument descriptions above.
|
|
Reflection
This was a short project, but I think it was successful. One peak, or something good was overcoming challenges. We had to overcome the problem of air escaping the trombone tubing. To do this we had to analyze the problem and taught us how to correctly build an airtight instrument. We ended up adding tape to the pipe to make the air unable to get through at the openings. Another peak was time management. We successfully finished the project on time and I feel that we were always on task when we had to be. This was important because we had a complex design for the trombone and we needed all the time we could get to make it work. One pit, something that could have gone better, was getting materials faster. We had materials such as PVC pipe and guitar strings that we needed to go out and buy. I think that we could have been a bit faster in figuring out what we needed and then buying it. With this extra time, we could have perfected our instruments even more. Another pit was the trombone's weight distribution. We could have improved on making the trombone more balanced and easier to play. The slide was too heavy so we should have added more weight to the back. Overall though, I think this project had more peaks than pits.
